Monday, December 26, 2011

2011 CHRISTMAS DINNER

This year, my daughter Eren decided to help with Christmas dinner and added her creations.  She made  centre pieces in the shape of Christmas tree using magazines, Ginger breadhouse mug decorations, napkin holders using candy canes, cupcakes in the  shape of hot coco (with candy canes for handle), wreath appetizer using Pillsbury croisant dough and cream cheese & dill mix, I added the feta filled roasted red peppers to create our colourful Christmas dinner table.

What was on the menu?

Stuffed Turkey.  This year, I bought prestuffed Butterball on the recommendation of a friend.  This was a great time saver and turned out nice and juicy.  It went from freezer to the oven (no defrosting required).  The only thing I had to remember is to cook it 1 hour less than the instructions on the packaging.  For example,  I had an 8 kg Turkey.  It was to cook for 7 1/4 hours at 325 defgree F.  I cooked it for 6 1/4 hour at 325 degree F.  I'd highly recommend this when you have so many other things to cook.

Mashed potatos
Mashed turnip
Roasted red peppers stuffed with feta cheese and dill
Mixed salad
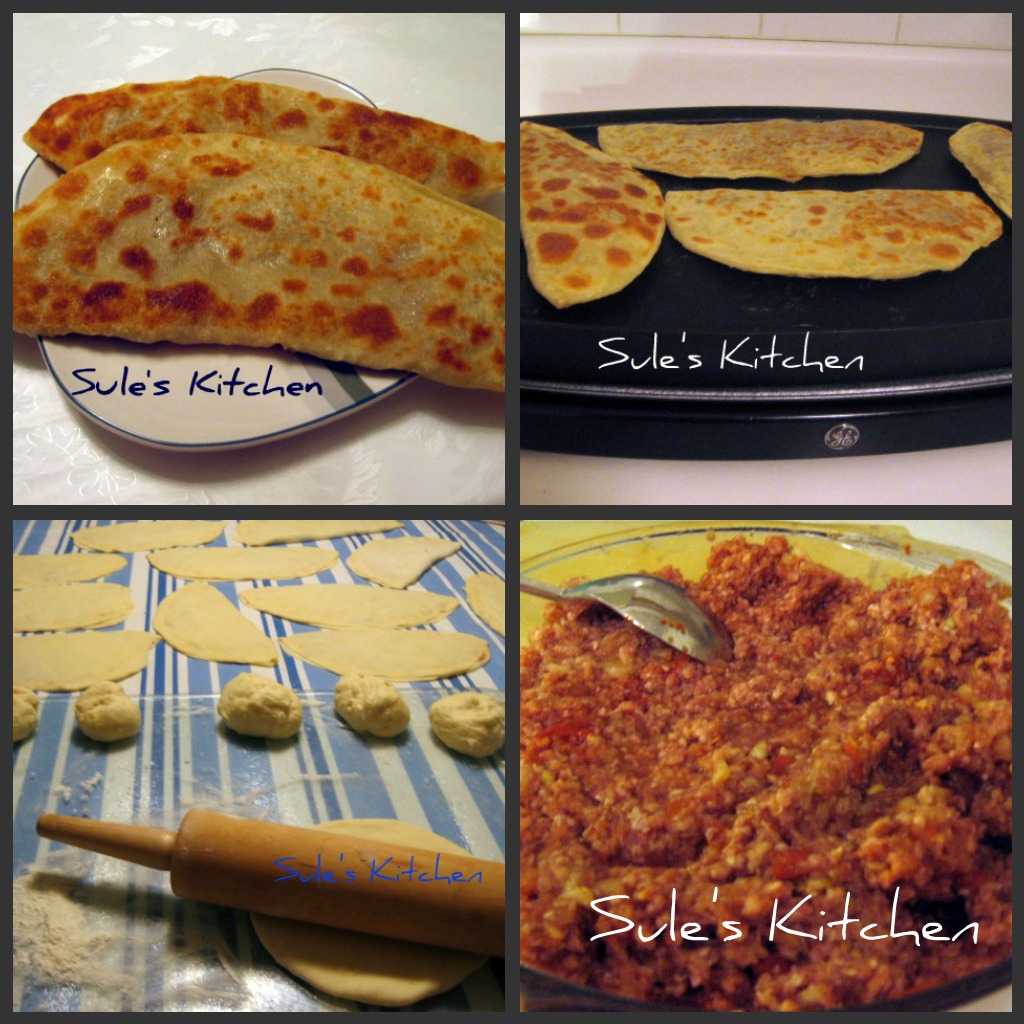
Borek (Pastry filled with ground beef and vegetarian kind filled with potato and cheese)
Dolma (grape leaves filled with rice)
Cheese sticks with pasta sauce
Fried green beans
Shrimp

For desert, chocolate cake, cup cakes and cookies

Tuesday, December 20, 2011

SPINACH DIP

There are many versions of this dip on the internet.  I tried all of them.  This is my favorite.  It has cream cheese in it which gives it a special flavour.  For new years or Christmas parties, this is a very good option... I had a small get together this time so I served with crackers, but  for a bigger party, the best way to serve it inside a hollowed round pumpernickel bread.  You can serve the carved out pieces on the side.  Most important part of this recipe is that it must be done a day ahead and sit in the refregirator over night.


1 package frozen spinach (300 gr)
   OR 400 gr. fresh spinach cooked in a little bit oil in a wok/frying pan
1 package cream cheese (250 gr)
1 cup sour cream
1 cup mayonnaise
1 package Knorr swiss vegetable or herbal soup mix.
   (I find a whole package too much for salt content and use only 1/2 package)
  • If you are using fresh spinach, wash and clean the spinach and cut into small pieces.  Stir fry in a little bit of oil.  This only takes a couple of minutes.  Let it cool.  I prefer freshly cooked spinach.  Stores sell fully washed spinach in bags which work really well for this recipe.
  • If you are using frozen spinach, make sure it is defrosted and fully dry before using in this recipe
  • Mix together all except soup mix in a food processor.  Add the soup mix a little at a time to find the desired salt content.  As I outlined in the ingredients section, I find a whole package is too much to use.
  • Cover and let it sit in the fridge over night
  • When it is time to serve, carve out the bread and fill with this dip.  Put pieces of the bread on the side for dipping.  You can use other vegetables for this dip as well like carrots or celery.

Wednesday, December 7, 2011

FAKE TURKISH PATTIES (YALANCI CIG BOREK)

Strange name for a recipe but translation from Turkish is a challenge sometimes.  Even in Turkey, this borek has many different names like Ci borek, Sirborek.  Wikipedia has a pretty good explanation of all these different names and how they came about.  I called it "patties" because the shape reminded me of Jamaican patties.  I called it "fake" because I modified the dough to make it easy on myself when it came to rolling it out.  Also, I cooked it on a hot plate rather than frying in lots of oil due to concerns over extra calories.  Nevertheless, it turns out pretty close to the real taste.  You can modify further with additional spices like chili peppers if you enjoy spicy foods.


Dough
1 cup milk (room temperature)
1 cup water (room temperature)
1/2 cup cooking oil
1 egg
1 teaspoon salt
Flour (approx 4 cups)

Filling:
1/2 kg lean ground beef
3 onions
3 tomatoes
1 teaspoon salt
black pepper

Cooking: either fry in lots of oil or brush with cooking oil if cooking on a hotplate
  • First make the dough... Mix together egg, oil, water, milk and salt
  • Add flour a little at a time until you have a dough that does not stick to your hands.  Softness should be a little soft (like your ear lobes)
  • Cover dough with Saran Wrap and let it rest for a couple of hours at room temperature
  • Make the filling by mixing all the ingredients.  Onions and the tomatoes need to be grated.  It should be a little watery to allow you to spread a thin layer.  If the onion and the tomatoes are not too juicy you can add some water.
  • Take small pieces of the dough and make them into small balls (size of a large walnut)
  • On a floured surface, roll out a thin round piece
  • Spread filling in a very thin layer
  • Close in the shape of a half moon
  • Cook on a hot plate that is preheated to 350 degrees making sure that the hot plate is covered with a little bit of oil.  If necessary, brush more oil before turning over
  • Cook until golden brown on both sides

Friday, November 25, 2011

RACK OF LAMB: FLATTENED

Lamb is my favorite meat.  It is soft and delicious.  This recipe is extremely simple and fast.  Barbeque is the best way to cook but in the winter time, I prefer "fried" in very little olive oil.. Mmm. 
1 package of rack of lamb (1 package consists of 6 at Costco)
6 tablespoons olive oil (1 tablespoon per piece)
6 teaspoons thyme leaves (1 teaspoon per piece - 1/2 on each side)
Salt
Additional olive oil for frying
  • Cut rack of lamb into individual servings by cutting one bone at a time
  • Put each piece in a zip lock bag and flatten with a meat tenderizer (mallet)
  • Rub 1 tablespoon of olive oil on both sides of individual pieces
  • Salt both sides and sprinkle with thyme leaves
  • Fry at high heat in a little bit of olive oil or barbeque.  It cooks in minutes.


Saturday, November 5, 2011

YOGURT CAKE DESERT

This is a specialty desert.  It looks like a plain cake but because it has a sugar based syrup, it is quite sweet.  Yet, it is surprisingly "light".  You can almost call it "fluffy".   The name "Yogurt Cake" seems to be used for another version of this cake which is known as "Revani"  As far as I know, the difference is Revani has Semolina.  This is my mom's recipe.  There is no Semolina in it so I believe it is the real Yogurt cake recipe.  There are a couple of secrets to getting this cake right: First, it must be made a day in advance to allow the syrup to soak through the cake.  Second, syrup must be fully cooled but the cake must be hot when you pour the syrup over the cake.


1 cup plain yogurt (drained)
1 1/3 cup powdered sugar
3 eggs
2 tablespoons unsalted butter (melted)
2 cups flour
2 teaspoons baking powder

Syrup
3 cups sugar
3 cups water
1 tablespoon lemon juice
  • First prepare the syrup.  Combine sugar and water.  Bring to boil.  Add the lemon juice.  Boil for 5 minutes.  Set aside to cool.  Syrup must be totally cooled before you pour it over the cake. 
  • Drain the excess juice from the yogurt by putting it in a strainer over an empty cup and leave in the fridge for 30 minutes
  • Using a mixer, mix yogurt and powdered sugar first.  Add in eggs, butter and continue mixing
  • Add baking powder and flour last.
  • For variety and added flavour some people add in vanilla or lemon skins but I prefer original recipe and do not use any of these things.
  • Pour into a 9 inch (229 mm) springform cake pan
  • Cook at 350 for 35 to 40 minutes
  • Once out of the oven, let it sit for 10 minutes
  • Cut the cake diagonally
  • Pour syrup over the cake a little at a time to make sure it is soaking through
  • Cover with aliminium foil
  • Once the cake is fuly cooled, leave in the fridge overnight
  • Once ready to serve, take out of the pan and move over to a serving plate
  • Decorate with coconut

Saturday, October 29, 2011

BLEEDING HEART HALLOWEEN CAKE

Halloween is now known all over the world.  This certainly was not the case before internet.  Last night, we were at a show where people around the world were sharing their stories their first introduction to Halloween.  I would like to share one of the stories I heard.  It was similar to my very first Halloween in Canada.  This is how the story goes...Mom and dad come home from work tired.  As they were getting ready for dinner when the door bell rings.  They open the door to find a bunch of kids with expecting faces.  One of the accompanying parents explains what is going on.  The mom rummages through the kitchen cupboards and finds some candy.  Of course, their kids get very excited about this idea of "Trick or Treat".  Dad runs to a corner store to buy candy and while the mom tries to make up a costume from the dad's closet.  Kids are handed a small paperbag for their collection.  Reason being the mom doesn't want the kids to appear greedy.  Their very first stop is the next door neighbour.  Of course the small bag gets half filled at their first stop.  The neighbour suggests pillow cases.  Kids go back to the house but can't convince the mom to give them pillow cases so they settle with a shopping bag.  This marks their very first Halloween memory... Happy Halloween.

1 package vanilla cake mix
1 package dream whip or vanilla icing
1 small package (85 gr.) cherry Jello (prepare with boiling and cold water)
  • Prepare the cake according to package instructions
  • Spray a heart shaped cake pan with vegetable oil
  • Pour your cake into the cake pan and cook to package instructions
  • Cool cake for 1 hour
  • Boil cup water and add Jello mix.  Stir to melt.  Add 1/2 cup cold water
  • Put holes all over the cake and very slowly pour jello over the cake
  • Leave in the fridge for 3 hours
  • Decorate with dream whip and coloured candy

Friday, October 14, 2011

VEGETABLE QUICHE WITH BISQUICK

You can call this pie or quiche.  It is made with Bisquick and extremely easy to make. If you are having a vegetarian guest for dinner, an ideal choice for your dinner table.  You mix everything together.  Bisquick forms the crust while it is cooking so you don't have to worry about making a crust ahead of time.


2 cups chopped broccoli
1/3 cup chopped onion
1/3 cup chopped green bell pepper
1 cup shredded Cheddar cheese 
1/2 cup Original Bisquick® mix
1 cup milk
1/2 teaspoon salt
1/4 teaspoon pepper
2 eggs

  • Use broccoli flowers for this recipe.  Boil them in in salted water for about 5 minutes and drain
  • Grate the cheddar cheese
  • Wash and cut up all the other vegetables (onion, bell pepper) 
  • Spread all the vegetables in the middle of the pie plate (23 cm)
  • Mix together the eggs, milk, grated cheese, Bisquick, salt and pepper
  • Pour the bisquick mixture over the vegetables. 
  • Preheat oven at 350
  • Bake 35 to 45 minutes until golden brown.  You can also test by inserting a knife in the middle.  It should come out clean.
  • Cool for 5 minutes before serving.

Saturday, September 10, 2011

PASTA SALAD

This recipe is best with a Pasta type called Peperini.  Peperini looks like large sized couscous.  They are small and round, sold in the pasta section at the grocery store in small bags.  I think other small type pasta, like Orzo, would also work for this recipe. 

I made this salad a couple of weeks ago for an end-of summer barbeque party.  It received so many compliments that I made it again last weekend for a dinner party at my house.  It is very easy to make. delicious and pleasing to the eye because it is so colourful.  It doesn't have to accompany meals either, it makes for a great lunch.


1 cup peperini
1/4 cup oil
2.5 cup water
salt

5-6 pickles (with garlic)
5-6 tablespoon peas (from canned)
5-6 tablespoon corn kernels (from canned)
1 Red pepper roasted
5-6 tablespoons chopped parsley
3 green onions chopped
1 lemon juice
1/4 cup olive oil
2 teaspoon pomegranate concentrate (optional)
salt
  • In a medium sized pot, fry the pasta in 1/4 cup oil until they turn light brown
  • Add in water and salt
  • Reduce heat and cook until pasta is soft.  Be sure to stir occassionally to make sure it does not stick to the bottom.
  • Set the cooked pasta aside to cool while you prepare the remaining ingredients. 
  • Roast a red pepper.  I do this in my toaster oven.  Wash and cut the pepper in half.  Cook at 350 for 45 minutes.  Let it cool.  Once cooled, take off the skin and chop into small pieces
  • Wash and chop the green onion
  • Take the corn and green beans out of the cans and rinse in cold water
  • Once everything is ready, mix them all together. 
  • Add in lemon juice, pomegranate concentrate and olive oil.  Depending on your liking, you can add in more lemon juice and olive oil. 
  • Salt to your tast
  • Serve

Monday, August 1, 2011

GRILLED BALSAMIC CHICKEN

This is a very light breaded chicken recipe.  Very easy to make.  Great hot summer days.  If I hadn't tried this at a friend's house, I would not have tried making it.  Chicken and balsamic vinegar is not a taste I would have put together but it works!! Very light taste of balsamic vinegar makes it special.  I also think it is quite versatile.  It can be served on a bed of salad or with side dishes like potatoes and barbecued asparagus.  I am also going to try serving it as a sandwich in a nice Panini bread with a side of French fries and raw carrots. 


4 large chicken breasts (sliced width wise)
3/4 cup water
1/3 cup olive oil
2 tablespoons balsamic vinegar
2 tablespoons dried onion flakes
3 teaspoons Italian seasoning
3 teaspoons dry mustard
2 teaspoons thyme
2 teaspoons salt
2 teaspoons pepper
Lots of breadcrumbs
  • Slice chicken breasts width wise only if they are very thick
  • Mix all except breadcrumbs together and place in a large glass pan that you will use to marinade the chicken
  • Add chicken pieces to the marinate.  Poke chicken with a fork to make sure it will soak all the marinate
  • Marinade in the fridge for 1.5 hours (If you are in a hurry, 30 minutes is sufficient).  Be sure to turn the chicken at least once.
  • Prepare your cooking pan by lining with cooking paper
  • Put lots of breadcrumbs on a plate
  • Take each piece of chicken out of the marinade making sure each side is wet and dip in breadcrumbs.  Make sure both sides are covered with breadcrumbs
  • Preheat oven to 425 degrees
  • Cook for 30 minutes turning at least once

Sunday, July 3, 2011

BEEF AND VEGETABLE STIR FRY

I tried stir fry recipes before but found most to be too sweet.  This one was perfect and because of it, it gets to be published.  You can serve it on sticky rice or Chinese noodles.  If you like, you can add more vegetables like onions and zucchini. 


4 tablespoons olive oil (2 tablespoon for the vegetables and 2 tablespoon for meat)
1/4 cup soy sauce
2 Tbsp. Catalina Dressing (I used Kraft salad dressing)
3/4 tsp. ground ginger
1/2 kg (500 gr) beef flank steak, cut into thin strips
2 tablespoons cornstarch
1 pkg. (750 g) frozen oriental mixed vegetables, thawed, drained
1 onion, 1 red pepper, 1 zucchini
1 package bovril beef bullion
1/4 cup water
1/4 cup dry roasted peanuts or cashews 
Blackpepper and salt
  • Put 2 tablespoons olive oil in a wok
  • Add in chopped onion, red peppers and a zucchini and stir fry until soft and set aside
  • Toss meat with corn starch.  In a separate large and hot skillet, cook until done
  • Stir in frozen vegetables to the meat and cook until vegetables are soft 
  • Finally mix in the remaining vegetables
  • Mix soy sauce, 1 package bovril, 1/4 cup water,  dressing and ginger until well blended
  • Add blackpepper and salt to your liking
  • Cook and stir 3 min. or until sauce is thickened
  • Serve your noodles or rich onto the platter
  • Top with meat mixture and nuts

Tuesday, June 14, 2011

SPANICH AND CHEESE BOREK WITH PHYLLO PASTRY

This is a very easy Borek.  It can be served as an appetizer or to accompany a meal especially if you have a vegetarian guest.


1/2 package Phyllo pastry
  (8-10 sheets for the bottom, 8-10 sheets for the top)

1 package (227 gr) Spinach
200 gr. Feta cheese
salt

2 eggs
1.5 cups milk
1/2 cup cooking oil

Sesame seeds
  • First get your spinach ready.  Wash them and make sure they are dry. Chop small.  No need to cook.
  • Use a big (11x14) pan
  • Spray the pan so it does not stick to the bottom
  • Mix together eggs, milk and cooking oil to get a "sauce"
  • Put 2 sheets of pastry and pour 5 tablespoons of sauce and using a brush soak the dough. If the dough is broken or too long for the pan, don't worry, just make it fit.  The key is to make sure the dough is soaked
  • Continue the same way until the bottom layer is done
  • "Scrunch" spinach with salt. If you are using Feta which is already salted, you will need less but if you are using unsalted cheese like Palak Paneer, then you will need less.
  • If you like you can layer cheese and spinach or you can mix spinach and cheese before spreading it on the dough
  • Save some of your sauce for the top layer. The very top layer will need extra and will need to be soaked completely for softness so make sure you save enough
  • Pour the rest of the sauce on the spinach and cheese
  • Once Spinach and cheese layer is complete start the top layer of the dough the same way as the bottom.
  • Pour the remaining sauce on the very top.  Make sure the top layer is soaked.  The dough will look "wrinkled".
  • Let it rest for 15 minutes.  Occasionally check to make sure the sauce is not pooling on the sides and spread a bit if needed.
  • Sprinkle sesame seeds
  • Cook at 350 until the top is golden brown

Sunday, May 15, 2011

SUGAR COOKIES FOR SPECIAL OCCASIONS

This is a simple basic sugar cookie recipe. An absolute family favorite. Good for special occasions.  A couple of weekend was my sister in law's baby shower. I made them in the shape of baby feet. You can make them at Valentines day or at Christmas or any other special occasion. The trick of this cookie is for the butter to be left in room temperature for most of the day to ensure it is very soft and once the dough is prepared, it needs to rest in the fridge for a couple of hours so you can roll it out easily.


1.5 cups soft unsalted butter
1.5 cup sugar
2 eggs
2 tablespoons milk
1 package vanilla
2.5 teaspoons baking powder
1/2 teaspoon salt
Approx. 5 cups flour

Decorations:
Icing sugar
Milk
Coloured candies
  • Blend sugar and butter. Sugar will take the butter consistency
  • Add milk and eggs and continue to mix
  • Add salt, baking powder, vanilla and continue to mix
  • Add in flour to get a soft dough. After 3 cups of four, add 1/2 cup at a time
  • Cover and let it rest in the fridge for 2-3 hours
  • Roll out the dough thin as you prefer. Thicker cookies are softer.
  • Cut with cookie cutter
  • Bake at 350 for 10 - 15 minutes. Once the edges look cooked, take them out.
  • Let them cool
  • For icing, mix icing sugar and milk. I like thicker consistency
  • Cover the cookies and decorate
  • Let the icing totally dry before putting the cookies away

Sunday, April 24, 2011

OATMEAL AND HONEY BREAD

I bought a bread machine couple of years ago.  Never had a chance to use until today simply because I could not find the time to take it out of the box to clean and read the instructions.  Isn't it really sad that we can't find time to do the things we enjoy!  I finally used it today for this recipe.  Fluffy and mildly sweet.  Simply delicous.

I wrote the recipe both for the machine and manual versions.  Of course, this is when I realize how much time I lost making it manually all these years while the bread machine waited in a box.


Ingredients for the bread machine:
1 cup water
1 tablespoon vegetable oil (you can use butter instead or both)
1/4 cup honey
1 teaspoon salt
1/2 cup rolled oats
2 1/3 cup flour
1.5 teaspoon dry yeast
  • Put all liquid ingredients in the bread machine first.
  • Add rolled oats and flour last
  • Make a small "pool" with your fingers for the yeast and put yeast in (making sure it does not touch the liquid)
  • Select light setting on the machine
  • Takes 3 hours
Without a machine:
2 cups boiling water
1 cup rolled oats
1/2 cup honey
2 tablespoons butter
2 teaspoons salt
1.5 teaspoon dry yeast
1/2 cup warm water
4 cups flour

  • In a large mixing bowl, combine boiling water, oats, 1/2 cup honey, butter and salt. Let stand for 1 hour.
  • In a small cup, dissolve yeast in warm water. Let stand until creamy, about 10 minutes.
  • Mix yeast and oat mixture together.  Add 2 cups of flour; mix well. Stir in the remaining flour, 1/2 cup at a time, beating well after each addition. You may need all 4 cups or less.  Just keep an eye to make a soft dough that is not too sticky. 
  • When the dough is ready, put it on a lightly floured board knead until smooth and elastic, about 20 minutes. Lightly oil a large bowl, place the dough in the bowl and turn to coat with oil. Cover with a damp cloth and let rise in a warm place until doubled in volume, about 1 hour.
  • Punch down the dough.  
  • Spray or grease a 2 lt pan (or use a non stick pan).  Place the dough in the pan.  If you like you can brush 1 tablespoon honey and sprinkle additional oats on top.  Cover and let it sit another 40 minutes to rise.
  • Preheat oven to 375 degrees F (175 degrees C).
  • Bake until top is golden brown (about 30 minutes).  
  • Remove loaves from pan and serve

Saturday, April 16, 2011

BUNS WITH CHEDDAR CHEESE

These buns are great for breakfast.  The dough is nice and soft.  Perfect compliment to Cheddar cheese.  You can either make them as a bun or you can roll out the dough, put cheese in the middle in the shape of crescents or circles.  This is a lot of dough for our family.  I usually make this dough and divide in half.  Make cheese buns with half (when you do this, please remember to reduce cheddar cheese to half as well), and use the other half for other things.
1/4 cup warm water
1 tablespoon sugar
1 tablespoon yeast

3/4 cup warm water
1 cup warm milk
1 teaspoon salt
2 tablespoon cooking oil
1 or 2 cups graded cheddar cheese (Depending on your preference)
5.5 cups flour
1 egg yolk for glaze
Sesame seed/blackened sesame seeds or poppy seeds for sprinkle
  • Combine 1/4 cup warm water, 1 tablespoon sugar, 1 tablespoon yeast and set aside for 15 minutes
  • Add yeast, remaining water, warm milk, salt, cooking oil and 5 cups of the flour and make a soft dough.  Be careful with the remaining 1/2 cup of flour.  You may not need it at all or need more.  Just add a bit at a time.  It is important to continue to knead the dough.  When it no longer sticks to your hands, it is ready.  Cover and set aside in room temperature for 1-2 hours to let the dough rise.
  • If you are planning to use the shape of the buns same as mine, add shredded cheese into the dough and knead to make sure cheese spreads all through the dough.  Save a bit of the cheese for the top.  Take small pieces (about the size of a clementine) and roll out to a "stick" and tie in the shape of the bun and put on a lined cookie sheet
  • My kids like the ones that are shaped like circles with cheese in the middle.  To make those, take a small piece of dough and roll it out.  Put cheese in the middle and roll into shape of sticks, making sure there is no room for cheese to come out during cooking.  Roll into a circle and put them on a lined cookie sheet.
  • Glaze with egg yolk and sprinkle with sesame seeds or poppy seeds  
  • Preheat oven 350 degrees
  • Cook until golden brown (35-40 minutes)

Saturday, April 9, 2011

TAHINI COOKIES (TAHINLI KURABIYE)

When I was a little girl, I did not like the taste of Tahini.  Things like Hummus didn't used to appeal to me until my teenage years when I discovered what I was missing.  I was missing a lot!  These cookies are easy to make.  They don't have a strong taste of Tahini so if you've never tried Tahini before and would like to try, these may be good to start with.  These cookies are easy to make and stay fresh for a long time if kept in a jar with closed lid.  They are normally done plain but I like the chocolate dipped for variety. 


1 cup cooking oil (I use Mazola)
1 su cup icing sugar
2/3 cup tahini
1 package vanilla sugar
1 teaspoon baking powder
1 cup coarsly chopped walnuts
3.5 cup flour

Cikolata sauce (optional):
1/2 cup chocolate chips (I like dark chocolate)
3 tablespoons milk

  • Mix all of the ingredients to make a hard dough.  You will find that dough crumbles a bit.  That's okay.  Just press them together
  • Cover dough with Saran Wrap and leave in the fridge for 30 minutes
  • Preheat oven to 350
  • Cover a cookie sheet with cooking paper
  • Take a full tablespoon of the dough and shape it as you like.  You can even make designs on the cookies using a fork
  • Cook for 15 minutes.  Be sure not to over cook.
  • Once the cookies cool down.  Make your chocolate sauce by microwaving the chocolate in milk for 1 minute.  You will find all the chips will not have melted.  Stir well to get them to melt.
  • Dip part of the cookies in chocolate sauce and put them in the fridge to harden for 15 minutes
  • Put on serving plate.
  • Enjoy

Friday, March 25, 2011

NESTLE'S ROLO COOKIES

I published this recipe before and under the name "Marble Cookies" because of the shape I used.   This time, I combined it with Nestle's Rolo candies in the middle.  The caramel and chocolate combination of the candies gave them a very nice twist.  Perfect with coffee or tea at any time.


Makes 40 cookies

1 cup sugar
1 teaspoon baking powder
250 gr unsalted butter (room temperature)
1/2 cup cooking oil
1/2 cup plain yogurt
1 package vanilla
1 egg
Flour
Nestle's Rolo candies with caramel in the middle
Powdered sugar for sprinkle
  • Mix all the ingredients (except powdered sugar and Rolo) together. Add enough flour to make a soft dough. It should not stick to your hands. Let it rest for 10 minutes
  • Take a small size dough (about size of a walnut) and flatten it in your palm.
  • Put 1 Rolo in the middle and roll into a ball
  • Put on a cookie sheet
  • Repeat until all the dough is used
  • Cook at 350 degree oven for 30 - 35 minutes until the top of the cookies are a bit pink
  • Remove from oven and let them cool
  • Sprinkle powdered sugar on top for decoration.

Saturday, March 19, 2011

CHICKEN NOODLE SOUP WITH TOMATOES

When you need to make something quick, this soup is a life saver.  You don't have to have chicken pieces in it for a great taste.  Chicken bouillon is sufficient enough with plain water.   I use my mom's recipe where she combined chicken stock and bouillon.  This soup always reminds me of my mom.  Whenever she had friends drop in around dinner time unexpectedly, she always insisted they stay for dinner and quickly made this soup as a starter to the meal.  The fact that everyone always liked this soup was a bonus.
4 cups water or chicken stock
2/3 cup (150 ml) noodles
1 chicken breast
1 cube chicken bouillon
3 tomatoes
1 teaspoon tomato paste
1 tablespoon butter
salt
Optional: dried mint and 1/2 lemon juice
  • Boil the chicken breast in 5 cups of water and boil until chicken cooks.  Breasts with bone in work the best.  Take the chicken breast out and set aside to cool.  This gives you the chicken stock you need for this recipe.
  • In a pot, put butter and crushed or grated tomatoes and cook until tomatoes are softened
  • Cut or tear small pieces from the chicken breasts
  • Add the chicken stock, chicken pieces and bullion bring to boil
  • Add in the noodles and cook until noodles are soft (5-8 minutes)
  • Add in salt, pepper and mint to your liking
  • Serve with lemon juice on the side

Friday, March 11, 2011

SWEET REFRIGERATOR ROLLS/ CINNAMON ROLLS

I have fond memories of this recipe... It is the recipe I used for my very first dough in high school in the "Home Economics" class.  This time I added a twist of my own and made half into cinnamon raisin rolls for breakfast.  They are delicious plain or otherwise.


2 teaspoons dry yeast
1/4 cup warm water
2 teaspoons sugar

2 cups lukewarm water
2 eggs
1/2 cup sugar
2 teaspoons salt
4 tablespoons oil
Flour (approx. 8 cups)

Makes 24 buns/rolls

If you intend to make raison rolls
3 tablespoons melted butter
3 tablespoons cinnamon
1 cup raisons
  • Dissolve 2 teaspoons sugar in 1/4 cup lukewarm water.  Add yeast. Set aside for 10 minutes.
  • In a large bowl, beat eggs, sugar, salt 
  • Add 2 cups lukewarm water
  • Add in half the oil
  • Gradually add rest of the flour until the dough does not stick to your hands
  • Turn dough onto floured table and knead until smooth.  The dough should spring back when lightly touched.
  • Put the dough back in the bowl.  Pour the rest of the oil over the dough.  Cover with Saran wrap
  • Leave in the fridge for minimum 4 hours.  It is better if left 24 hours.
  • If you are intending to make cinnamon rolls, separate half the dough and add in melted but cooled butter and raisens
  • Shape dough into rolls.  I made 3 balls and put 3 of them into eavh of the muffin cups
  • Let the dough sit for another 1-2 hours to rise
  • Bake at 350 degrees until golden brown 20-25 minutes

Saturday, March 5, 2011

ZUCCHINI SOUP WITH DILL

This is absolutely the best Zucchini soup I ever had.  It is creamy with lots of dill flavour.  It is a must try!

1 kg Zucchini
1/2 cup vegetable oil
2 tablespoons flour
1 Bouillon cube
Milk (3 cups)
Water (1 - 2 cups)
Dill (1 bunch)
Salt
  • Grade Zucchini with large side of the grader
  • Put oil in the soup pan and add flour.  Cook at medium until the flour smell is gone.  Be sure to continually stir and ensure that flour does not change colour. 
  • Add milk bring to boil until it is same consistency as yogurt
  • Add graded Zucchini
  • Mix bouillon cube with water and continue to cook until it is soup consistency (Approx 15 minutes)
  • Add salt
  • Let it stand a bit
  • Wash and chop the dill and add just before you serve.

Saturday, February 19, 2011

CRESCENT BREAKFAST BUNS (ACMA)

Acma is a type of bread/bun.  It can be made plain or with many varieties of filling.  I wanted to make them for this long Family day weekend breakfasts.  My original intent was to make them plain or with cheese but when I realized I had some left over chocolate muffins from Valentines day, I decided to try the with a filling I saw in my friend Asuman's blog (Arnavut Cigeri) quite some time ago.  Since I wasn't sure how they were going to turn out, I made a mix of plain and with filling.   I used my own recipe for the dough, Asuman's filling.  Next time, I intend to drizzle melted chocolate over the cake filled ones.
Dough
3 cups all purpose flour
1 cup warm milk
2 teaspoons quick dry yeast
3 tablespoons sugar
50 gr unsalted melted butter
2 eggs (save the yolk of 1 for the glaze)

Chocolate Cake Filling
3 cups chocolate cake or cupcakes (pre- made)
1/2 cup chopped walnuts
1/2 cup chopped almonds
1/2 cup raisins
1/4 cup sugar
1 cup milk
1 teaspoon cinnamon

Glaze
1 egg yolk
Almond slices
Melted Chocolate

Makes 9
  • Mix together Flour, yeast, and sugar
  • Add in melted butter, warm milk and egg
  • Make a soft dough
  • Cover and let it rest in a warm place for 1 hour. 
  • Knead the dough once more
  • Separate dough in 9 equal pieces.  Cover and let it rest until you have the filling ready.
  • If you are intending to make it plain, you can shape it at this time.  I "braid" the dough.  From each of the 9 pieces, you can further separate 3 pieces to roll out to 3 "sticks" and braid them.  Once ready, you can let it rest for 30 minutes.  Glaze and sprinkle blackened sesame seeds before cooking.
  • Prepare the filling by pouring the milk into a pot.  Add all of the other ingredients and cook until thickens.  Cool
  • Once ready, take each piece and flatten to oval shape.  Put some filling in the middle and roll it to cover.  Make sure the seam is in the bottom.  Give it a crescent shape on the lined pan.  Glaze with egg yolk and sprinkle almond slices.
  • Cook at 350 until golden brown.  For the cake filled ones, you can melt chocolate and drizzle over them once they are cooled.

Saturday, February 12, 2011

EASY MUFFIN CAKE

Nothing from scratch here but works just fine if you are short of time.

Happy Valentines Day!!!
1 package chocolate cake mix
1 box vanilla icing
1 bottle red icing

  •  Prepare cake mix according to package instructions.  My cake mix called for 2 eggs, 1/3 cup water, 1/3 cup oil for 12 cupcakes.  I cooked at 350 degree preheated oven for 20 minutes
  • Let cupcakes cool for a couple of hours
  • Put vanilla icing on each one and arrange in the shape of a flower
  • Line around the flower with generous amount of red icing
  • If you have a decoration in the shape of a heart, put that in the middle muffin


Wednesday, February 9, 2011

WIENER AND BEANER CASSEROLE

Because I was a working mom, my girls went to daycare when they were little.  We picked their daycare with special care after visiting many.  We managed to pick a daycare they adored with many wonderful friendships, caring teachers and one that served them hot meals.  This particular dish was one of their favorites at the daycare.  Since our home cooked meals are mainly Turkish, eating wieners and beaners ended for them at the same time the daycare ended.  The other day, they were reminiscing about this dish.  I had never made it before.  So, I decided to look for a recipe for a surprise.  They are not kids any more but they ate it all up real quick remembering and telling stories from the daycare centre.  They said it tasted just like they remembered it.  My husband and I enjoyed it too.  I will certainly make it again.

2 cans Heinz Beans in tomato sauce
10 hot dogs
2 tablespoons brown sugar
1/3 cup ketchup
1 package Lipton onion soup (dry)
1/4 cup water
1 tablespoon yellow mustard
  • Cut up the hot dogs bite size
  • Mix all of the ingredients together and add to cut up hot dogs
  • Put into a small baking pan
  • Preheat oven 350 degrees
  • Cook for 1 hour (uncovered)

Wednesday, February 2, 2011

EGGPLANT AND RED PEPPER SALAD

Eggplant is a low calorie vegetable with vitamins A, B, and C as well as calcium and iron.  It has many health benefits including lowering blood pressure, and cholesterol.  Eggplant is an acquired taste but for those of us who successfully acquire the taste, it is one we can't ever give up.  If you are one of those people who likes Eggplant, you'll love this salad.


3 large Eggplants
2 large Red Peppers
2 cloves crushed garlic
2 green onions
1/3 cup olive oil
1 lemon juice
A little bit of parsley (optional)
Salt
  • Wash the Eggplants.  Cut the end off.  Cut them in half
  • Wash Red Peppers and take out the seeds.  Cut them in half
  • Put eggplants and red peppers on a pan (face down).
  • Preheat oven to 350 degrees.  Cook for 1 hour.  You'll know when it is ready by pressing the Eggplant in the middle.  It will be soft.
  • If you like you can roast the eggplant and red peppers on the barbecue for better results
  • Once cooled, peel the skin from both the eggplant and the red peppers.  You can use a spoon to remove the inside of the eggplant
  • Cut Eggplant, red peppers in small pieces
  • Wash and chop onion and parsley
  • Prepare the sauce by combining crushed garlic, lemon juice, and olive oil
  • Mix all the vegetables together.  Add salt and sauce
  • Serve cold or room temperature

Saturday, January 15, 2011

MARBLE COOKIES

I've seen people get really creative with this cookie recipe when it comes to making them in different shapes.  For example, shape of a daisy with the middle being a small chocolate ball and pedals with a mix of white and chocolate or like a checker board.  I chose a simple "marble" look because I was in a hurry.

1 cup sugar
1 teaspoon baking powder
250 gr unsalted butter (room temperature)
1/2 cup cooking oil
1/2 cup yogurt
1 package vanilla
1 egg
Flour
1 tablespoon cocoa
  • Mix all the ingredients (except coco) together.  Add enough flour to make a soft dough.  It should not stick to your hands. Let it rest for 10 minutes
  • Cut the dough in half
  • Add cocoa in one of the halfs
  • Make two balls with each.  With white at the bottom and chocolate on the top roll out.  I like to roll them out separately same size and put one on top of the other
  • Roll them together to look like a log
  • Cut pieces about 2 cm and flatten with your hands
  • Put on a cookie sheet
  • Preheat oven 350 degrees
  • Cook until the sides are hard (approx 20 minutes)